If you’ve been following my blog series How to Throw Your Best Party you’re probably thinking, “Really? The invitation gets its very own post?” My answer – oh. yes.
When throwing a party there are certain things that one must do and certain things one can do. Choosing the right invitation is a must and here’s why. An invitation is the first thing your guests are going to see. You want to make it count! An invitation can convey so much – from the tone of the party (casual or upscale?), to the theme (camping or champagne?), to all those important details like date, time, and location. Your invitation is definitely a place that you want your theme to be center stage.

Once you have chosen your theme and figured out all the details, you can get to the fun part – asking your friends and family to come!
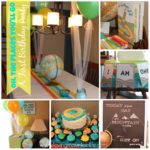
I love to start my quest for the perfect invitation online. The first sites I visit are Etsy, Pinterest, and Google. Sometimes though, I just can’t find an invitation that really speaks to me on those sites. Or, I can’t find one that fits my budget. If I can’t find the perfect invitation then I head to PicMonkey and create one of my own, like this invitation for my daughter’s 7th birthday party.

What is PicMonkey you ask? It’s an amazing online editing program that is…(wait for iiittt)…free. Yes. FREE! Say whaaaatt?! I know!
In this post I’m going to help you learn how to use PicMonkey in order to DIY an invitation for your next event. Let’s get started!
How to Make a FREE Invitation Using PicMonkey
First, find a background you love (like this one from The Fulltime Family) and save it to your computer. I use Google Images or Pinterest to find a perfect invitation background.
Next, open www.picmonkey.com in your browser.

Then click on the “Design” icon.

You’ll see a screen like the one below. Click on the arrow next to “Open” and select “My Computer”. Then select the background image you saved to your computer earlier.

When your background is open, you may need to re-size it depending on the size of invitation you want to make. (Note: Often the envelopes you’re going to use dictate this. I always have extra 5″ x 7″ envelopes on hand from my Christmas cards. I think it’s a great size for invitations as well because it allows ample size for my image and readable text.) To resize your background, click on the “Crop” icon and select the size you prefer from the drop-down menu.


Drag the corners of the crop box to include the parts of the image you want to be part of your background. Then click “Apply”.


Now that you have the background sized appropriately it’s time to add text. Click the “Tt” icon.

This opens a menu of fonts on the left hand side as you can see below.

Select the font you want to use and click “Add Text”.


Enter your text in the box where it says “Type your text here”. You can also drag and drop to reposition your text box.

You’ll also see a menu box pop open. Using this menu box you can adjust the text justification, change the font size, and change the font color.

For example, in the image below you’ll see that I moved my text box to the top of my invitation, aligned it to the center, and changed the font size to 48.

At this point you can repeat this process as many times as needed until your invitation says what you need it to say. I recommend using a new text box for each line of text – this makes it easier to fully customize and mix and match fonts. I typically use 2 different fonts – one simple/block style font (in this case Geo Sans Light) and one script font (in this case Bilbo Swish Caps).
Here’s an example using my Frozen invitation. On my second line of text I repeated the above mentioned process but this time chose Bilbo Swish Caps as my font. I repositioned my text box, centered the text, and changed my font color to 00a2c6. You can find the font color in this little band of letters and numbers. (Note: It comes in handy to write that gobble-de-gook down in case you want to use the same color elsewhere on your invitation!)

Another trick to use when making an invitation is the “Duplicate Text” feature. It saves you from having to remember the fonts you’ve chosen, or the font size or color. To use the “Duplicate Text” feature simply right click on your desired text box. A drop down menu will appear. Select “Duplicate Text” from this menu.

An exact replica of your original text box will appear. Reposition the new text box and alter its contents as needed.

For my Frozen invitation I continued adding details about my party using all of the tips and tricks above. I even added some purple text (font color c6008f in case you were wondering) for the Anna loving girls in my life – aka: ME! It was looking like this:

At this point I wanted to add a little separation between the words Cake, Cocoa, and Frozen Fun. There are many extras and affects available with PicMonkey. If you click on the butterfly icon it opens a huge menu of “Overlays” with which you can play around.

However, I wanted to use snowflakes which I had to find elsewhere. I clicked on the heart icon at the bottom which opened up the “Themes” menu.
![]()
Then chose “Winterland”.

Then chose “Flakery”.

I selected the snowflake I wanted to add between my text.

From here I was able to reposition the snowflake, resize it, and change its color. I remembered the blue color (00a2c6) I’d used for my font earlier and made the snowflake the same color.

Then I right clicked on the snowflake and used the “Duplicate Overlay” trick from earlier to add a matching snowflake.


I continued adding details about the event until it looked something like this.

Now it was time to save the invitation to my computer. To do this click the “Save” icon.

You will be able to name your file whatever you’d like.

Then click the “Save to my computer” icon. You’ll be able to select the file destination on your computer. (Note: it will be saved as an image (.jpg) file.)

And here you have it!
It’s gorgeous, friend! Well done! 😀
You can now print this bad boy any way you’d like! I inserted it into a Microsoft Word document in landscape orientation with narrow margins. I was able to fit two of my invitations side by side on an 8.5″ x 11″ piece of paper for printing. I printed the document onto white cardstock and had a fabulous invitation for pennies!
Does it get any better than that?! I hope you found this tutorial helpful. Let me know if you have any questions – I’d be happy to help answer them! Also, don’t forget to subscribe to Loving Mountain Life’s blog so you’ll never miss an update and follow along with us on social media!
Happy DIY-ing,
🙂 Meg